Overall, I think that this project went successfully. Although I had problems with taking my photos at the start of the project, I learned from my mistakes and got several shots that went together well in the editing process.
During the editing process I found a few difficulties such as the lighting and getting everything to be perfectly aligned, but I managed to make panoramas that were given little criticism editing-wise.
As for time management, I think that I should have spent more time taking photos to get better locations. Although I had problems taking the shots in the first place, I ended up having more than enough time to edit the photos together so spending more time getting better photos would have been a better idea.
Things that I liked about this project were editing the photos together and learning more about Photoshop to develop my skills. I also found taking the pictures interesting as I rarely do any photography so I also learned about taking good photographs.
Things that I would have done differently would be photographs, and time management in general because I felt that I spent too much time focusing on Photoshop rather than locations or my blog.
If I were to do this project again I would plan my time better by thinking more about the locations of my shots and to have a different theme.
Tuesday, 18 October 2011
Class Crit
Upon finishing my panoramas, I showed them in front of my classmates for critique. Overall, I got positive feedback for each of my panoramas, with feedback saying that they were all edited together well and I was given little to no criticism on it.
The main part of my criticism was from my choice of locations, and that they were too bland. The choice of locations for the house and garden didn't have enough to look at, os if I had the time to choose my locations again, I would go for more interesting choices so there was more interesting things to look at in the photo.
The one piece of editing criticism I got was for the living room panorama where some of the wall colours didn't match up as well as the could have, but that was the only complaint.
From these criticisms, I think that I should have taken pictures in more interesting locations, although I would have to find a place that would also be easy to photograph with a tripod.
My Finished Panoramas
After editing all of my panoramas, I exported them as jpegs and put the in the VR code so they can be viewed on a website interactively. These are my three finished panoramas:


This is the panorama that was taken in my living room. I felt that this was the second hardest to edit, as it was taken indoors. The main problems I had were with the lighting, as it changes drastically in some parts of the image. I had to use techniques such as brightness/contrast masking and dodge/burn just to get the colours to look similar. The objects in the room were also slightly difficult to align, but because I took so many photos, I could use layer masking to get rid of parts of an object on a higher layer and it would still look like one whole object when the layers were put together.


This is the panorama that was taken on Cooksbridge's railway bridge. I think that this panorama was the most difficult one to stitch together as I had to use many techniques to put this together, and it was the one I started with first, so I had little experience with stitching images together beforehand. The main techniques I used for this panorama were warping specific parts of the image, and editing the brightness on many parts of the different images. I had most difficulty with aligning the background imagery together, and I had to warp many separate layers to make it flow well. The bridge was also difficult to edit as it was very close to the camera and there lots of different parts of it with different lighting.

This is the panorama that was taken in my living room. I felt that this was the second hardest to edit, as it was taken indoors. The main problems I had were with the lighting, as it changes drastically in some parts of the image. I had to use techniques such as brightness/contrast masking and dodge/burn just to get the colours to look similar. The objects in the room were also slightly difficult to align, but because I took so many photos, I could use layer masking to get rid of parts of an object on a higher layer and it would still look like one whole object when the layers were put together.

My third and final panorama was the one that was taken in my garden. I felt that this was the easiest to put together as the many bushes and trees made it more forgiving to stitch. This is because overlapping layers were disguised by the amount of foliage in the pictures. However, I had numerous problems with the lighting which were mostly fixed by using he Match Colour feature. I also had problems with putting the house together without it looking too warped. I ended up only using a few photos with the house in so the editing wasn't too intensive.
Sunday, 16 October 2011
Third Panorama
Overall, I found this set of photos the easiest to edit. This is due to numerous factors; the first panorama on the bridge had a lot of editing needed on the bridge itself and the amount of background imagery needed to align properly, and the second panorama was shot inside so the pictures looked more warped. As my final panorama was shot where there were more trees and bushes, it was easier to find parts that would fit together without looking too distorted.
The main problem with this panorama was the lighting differed a lot between pictures, especially on a section with a lot of bushes, where the light and dark contrast between the photos was drastic. Because there was too much colour difference, I couldn't just use layer masking to blur the colours. I had to resort to the "Match Colour" option.
 This is my original set of images. The middle part of the bushes is much darker than the other two edges, so I used match Colour to change the colour of the middle parts.

 After matching the colours so they fit in better, I then used layer masking to stitch them together.
Getting the house to match up properly was difficult, so I had to use the warp tool to make it fit correctly.
The main problem with this panorama was the lighting differed a lot between pictures, especially on a section with a lot of bushes, where the light and dark contrast between the photos was drastic. Because there was too much colour difference, I couldn't just use layer masking to blur the colours. I had to resort to the "Match Colour" option.


Getting the house to match up properly was difficult, so I had to use the warp tool to make it fit correctly.
Saturday, 15 October 2011
Second Panorama
For my second panorama, I used the same technique as the first for placing my images together. As this one what photographed inside, I needed to spend more time editing it so it didn't look too warped because the of the camera being close to the objects in the room. I did this by masking parts of objects completely so they showed the whole object from the previous layer. By doing this, I prevented using more destructive editing with the warp tool.
As well as using destructive editing for fixing lighting, I used a different non-destructive method on this panorama. I used a brightness/contrast filter on one of the layers so I could change the colour of it easily without having to edit the whole picture. By doing this, I made part of the picture blend easier.
As well as using destructive editing for fixing lighting, I used a different non-destructive method on this panorama. I used a brightness/contrast filter on one of the layers so I could change the colour of it easily without having to edit the whole picture. By doing this, I made part of the picture blend easier.
Thursday, 13 October 2011
Further Editing Techniques
To make my images more seamlessly edited, I had to use numerous techniques, with involved editing background parts of images, editing colours and warping images.
The first thing I would do when stitching images together would be to warp the images slightly so they would fit together properly. Moving the image slightly would make it less obviously warped, and make it look as if the images were blended together. However, this method would only work for large areas such as grass, and further editing would be needed for more detailed areas.
One of the main problems I found while stitching my images together was that some parts of the images would patch up but other parts wouldn't. To fix this, I selected parts of the image that wouldn't match up and cipied them onto a new layer to warp them. By doing this, the original photo is left intect and the newer, edited part matches up with the original photo.

In this example, I copied the bridge onto another layer and warped it, so the background stayed intact.
 Because I had to make many edits like these, I ended up with many layers. To prevent my editing from becoming confusing, I named all of my layers and places the warped layers into a folder with the original image they were edited from.
 To blend the colours effectively, I had to use a mix of destructive and non-destructive editing. Layer masking would work for larger areas such as the sky, but for parts where the colour contrast was more prominent, I used dodge/burn on low opacities to fix the lighting on parts of images so they would blend together well.
To make sure that both ends of my panorama would match up perfectly, I used the same image at the beginning and end of the panorama so the nearby pictures would blend well with both edges of the original picture. I think that this will save me time at the end of my project when I have to put my panorama together in the code.
The first thing I would do when stitching images together would be to warp the images slightly so they would fit together properly. Moving the image slightly would make it less obviously warped, and make it look as if the images were blended together. However, this method would only work for large areas such as grass, and further editing would be needed for more detailed areas.
One of the main problems I found while stitching my images together was that some parts of the images would patch up but other parts wouldn't. To fix this, I selected parts of the image that wouldn't match up and cipied them onto a new layer to warp them. By doing this, the original photo is left intect and the newer, edited part matches up with the original photo.

In this example, I copied the bridge onto another layer and warped it, so the background stayed intact.

To make sure that both ends of my panorama would match up perfectly, I used the same image at the beginning and end of the panorama so the nearby pictures would blend well with both edges of the original picture. I think that this will save me time at the end of my project when I have to put my panorama together in the code.
Tuesday, 11 October 2011
Starting to Create my First Panorama
To start creating my panorama, I firstly placed all of my images in a Photoshop document on different layers so I could work with all of the images separately. For a starting point with the editing, I roughly placed all of the images together so I would get a rough idea of what the finished image would look like.

Although some parts fitted well together at this stage of editing, I would have to edit some parts further for the image to flow better.
After placing the images together, I added layer masks to each of the photos and roughly blurred parts of the images so they would fit together. Using layer masks is a non-destructive way of editing.
 This is a before and after shot of simple layer masking. The top of the sky blends well but further editing to the colours will have to be done to the bottom part of the sky.

Although some parts fitted well together at this stage of editing, I would have to edit some parts further for the image to flow better.
After placing the images together, I added layer masks to each of the photos and roughly blurred parts of the images so they would fit together. Using layer masks is a non-destructive way of editing.

Sunday, 9 October 2011
Second Set of Photos and Theme Change
After dealing with man problems with my first set of photos, I chose more evenly levelled locations for my photos so I would not have problems with the images fitting together in Photoshop. Because I took pictures in different locations, I decided to change the theme of my panoramas to Where I Live as I took all of my photos very locally. I decided on this theme as I am not usually one for travelling so I thought that local locations would be fitting for me.
These pictures were taken on the railway bridge in Cooksbridge, inside my house, and the garden of the house. I reused the railway bridge photos I took from the first set as they would fit in with the theme and the pictures looked good when placed together.


These pictures were taken on the railway bridge in Cooksbridge, inside my house, and the garden of the house. I reused the railway bridge photos I took from the first set as they would fit in with the theme and the pictures looked good when placed together.
Further Research - Sam Rohn
Sam Rohn is a photographer that does VR panoramas, and has a site with many of his own. They have been made so you can see a whole area from top to bottom, and the panorama is made interactive on his site. I have chosen to look at his work because he has done a mixture of indoor and outdoor panoramas, which is what I plan to do. By looking at his work, I can pinpoint where I may have troubles on my own panoramas as well.
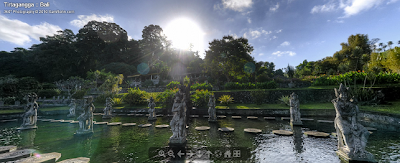


These are three examples of his work. The first image is in Bali, and from looking at this wrk I can see where I could have problems stitching my images together. Firstly, on his 3D panorama the sky changes colour where the sun is, and the sun is also facing on part of his photo, which could cause lighting problems with my own photos. Reflections could also cause interference when editing the photos together, as some parts way not match up.
The second image is at an Ikea Event in New York, ans as such, it has been taken indoors. This is a problem as the camera will be very close to many objects, so placing together the panorama may end up distorting them. This problem can be tackled if I edit carefully and use the warp too sparingly.
The last image was taken in Poland, and shows a landscape filled with trees. For my planned landscapes, there will be a lot of trees visible so I should look at these examples to see how to stitch together trees so they look realistic.
Friday, 7 October 2011
Problems With First Photos
When I tried to place my first photos together, I found that the images sloped downwards when I place them next to each other. This meant that the two images would not meet up at either end, and cropping the picture would leave very little of it left. The picture below shows my Photoshop document, with rules to show how much of the picture would be left if I cropped it.

Because of this, I have to retake my photos. I also chose different locations for my photos as I found taking photos in sloped areas too difficult, as I was having problems with my tripod even with a spirit level. Because of tripod problems, I had about 6 sets of sloped photos before getting panoramas that fit well across the whole area. I will also pay close attention to the tripod to make sure it doesn't change height so the pictures are taken on a completely flat surface.

Because of this, I have to retake my photos. I also chose different locations for my photos as I found taking photos in sloped areas too difficult, as I was having problems with my tripod even with a spirit level. Because of tripod problems, I had about 6 sets of sloped photos before getting panoramas that fit well across the whole area. I will also pay close attention to the tripod to make sure it doesn't change height so the pictures are taken on a completely flat surface.
Thursday, 6 October 2011
My Photos
My first set of photos were taken at various locations around the county which were considered local for me, including places such as Ditchling Beacon, Lewes Castle, Hamsey Church and Cooksbridge.
From these photos I got a variety of different types of shots, including shots of a whole area and others of specific places, such as the Lewes Castle shot.
For each of my locations, I took about 25-30 photos so it would be easier to piece together in Photoshop.
 This shot is part of my set with Lewes Castle. These shots had a good view of the castle, although the half not facing the castle seemed rather bland as it was mainly trees.
 This is one of my shots from Ditchling Beacon. The view from the top was a good location for taking photos, and the other side of the scenery wasn't too bland. This is one of my favourite location that I took photos at.
 This shot was taken in Cooksbridge, on top of the railway bridge. I thought this would be a good location as you can see a long shot of the village from up there, and there is also a good shot of the railway.
 This is a shot from Hamsey Church's graveyard. Out of all of my locations, I feel that this one is the weakest as it doesn't not fit my theme as well as the others do. Hoever, as there are graves all the way around the panorama it will look interesting from all angles.
Other photos from panorama shots:


From these photos I got a variety of different types of shots, including shots of a whole area and others of specific places, such as the Lewes Castle shot.
For each of my locations, I took about 25-30 photos so it would be easier to piece together in Photoshop.


 This is a shot from Hamsey Church's graveyard. Out of all of my locations, I feel that this one is the weakest as it doesn't not fit my theme as well as the others do. Hoever, as there are graves all the way around the panorama it will look interesting from all angles.
Other photos from panorama shots:


Subscribe to:
Comments (Atom)